Download Router Configuration
With Bigleaf’s Zero Touch Setup (ZTS) technology, setting up a customer router is easier than ever. All you need is a reliable DHCP network connection and your login to Bigleaf Cloud Connect. Setup and deployment can happen from anywhere, and updates and patch deployments are automatically installed, simply by having the device online.
Setting up a Bigleaf router for a customer site
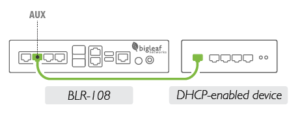
Connecting the Bigleaf router to a DHCP device automatically downloads the site configuration information to the router. The connection steps are the same for a standard BLR-108, BLR-112, and BLR-112 device with the expansion card. The image below shows a BLR-108 as an example.

- Connect a cable from the AUX Port on the customer’s Bigleaf router to a DHCP-enabled connection (firewall, switch, or other DHCP-enabled device). For security purposes, Bigleaf routers should be separate from the LAN, outside of the security perimeter (in a DMZ).
Note: If you need to install the expansion card on a BLR-112, hot swapping is not available for this device. To install the slot, turn off and unplug the device. Unscrew the screws on the standard slot and insert the expansion card and snap it into place, then tighten the screws.
- Using the provided power cable, plug the customer router into an Uninterrupted Power Supply (UPS). Do not plug directly into a wall outlet. The router automatically powers on and begins the configuration download. The router beeps once and displays a green power light when it’s fully operational.
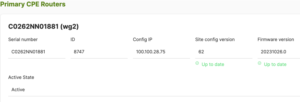
You may see on the Primary CPE Routers section in Bigleaf Cloud Connect that the router’s Firmware Version is Out of date. If you see this, no action is needed, the firmware will update automatically. (This can take a few minutes.)

When the firmware update is complete, the Firmware Version changes to Up to date.

Complete the router setup
Scroll to the top of the Configuration page in Cloud Connect for the site you’re setting up, and select Provision Site.
To see the IP information for the site, select Print configuration. Save this information, you’ll need it when you install the router at a customer site.
